本文用机器翻译 MagicOnion + MessagePack + YetAnotherHttpHandler でリアルタイム通信を行う
实际操作中某些步骤遇到问题,因此本文有所修正;
以及机器翻译不顺畅的地方,做了一些修改;
另外补充一些细节,避免读者实操遇到困难。
以下是正文,文中的“我”是原作者
概述
我在2024年使用最新版本的MagicOnion 6.1.4 + MessagePack 2.5.140 + YetAnotherHttpHandler 1.4.1编写了构建实时通信环境的过程。此外,Unity客户端甚至可以构建IL2CPP,而实时服务器则可以作为本地服务器启动。
促使我写这篇文章的是 Cysharp 发布的YetAnotherHttpHandler ,它可以与 grpc-dotnet 一起使用。直到最近,在 Unity 中使用 gRPC 客户端的唯一方法是在维护模式下使用 C-Core gRPC 库,而 AnotherHttpHandler 解决了这个问题。
本文的目标是创建以下工程:https://x.com/__tou__tou/status/1743201497654173782
此外,本文不涉及在服务器上实施 TLS 或将其部署到云服务。 (我觉得如果有需求的话我会写续集!)
后记:本文原本是一篇介绍用MagicOnion 5.1.8和YetAnotherHttpHandler 0.1.0搭建环境时遇到的绊脚石的文章。随着MagicOnion 6.0.1和YetAnotherHttpHandler 1.0.0的发布,更新了README,使环境搭建更加容易。因此,即使没有本文,阅读MagicOnion README、官方示例代码和YetAnotherHttpHandler README可能就足够了。
环境
- .NET 8 自.NET 7以来,Linux上的性能和gRPC性能似乎有所提高,因此我将使用.NET8的LTS版本。
- Unity2022 LTS 任何较新的版本应该没问题
- MagicOnion 6.0 一个可以用作实时服务器的框架
- MessagePack-CSharp C# 的快速序列化器
- YetAnotherHttpHandler 可与 Unity 一起使用的 gRPC、HTTP/2 客户端;与 grpc-dotnet 兼容;内部实现是 Rust
示例的 Git 存储库
下面是本文介绍的示例存储库。如果文章中的解释不够充分,请参考以下项目
MagicOnion服务器
程序大致分为MagicOnion Server版和Unity客户端版。首先,我们来谈谈MagicOnion Server。
提前准备
- 安装.NET SDK8.0
- 更新IDE
- 您可能需要将 Visual Studio 或 Rider 更新到最新版本才能支持 .NET8
初始文件夹结构
magiconion-sample-server
├── .git
├── .gitignore
└── README.md
创建解决方案
创建一个 .NET 解决方案和两个项目,并将这两个项目添加到该解决方案中。
这两个项目之一是 Server 项目,其中包含 MagicOnion Server 实现。第二个是Shared项目,它在Server和Unity客户端之间共享,定义了一组Interface。在Server项目端实现该接口,在Unity客户端使用该接口。
> cd magiconion-sample-server
> dotnet new sln -n magiconion-sample-server
> dotnet new console -n Server -o Server --framework net8.0
> dotnet sln magiconion-sample-server.sln add Server/Server.csproj
> dotnet new classlib -n Shared -o Shared --framework netstandard2.1
> dotnet sln magiconion-sample-server.sln add Shared/Shared.csproj
此外,服务器项目指定了最新的 .NET 8。自.NET 7以来Linux上的性能和gRPC性能都有所提高,所以我将使用.NET8的LTS版本。
Shared被指定为netstandard2.1框架,因为该项目在服务器和 Unity 客户端之间共享。
从资源管理器中双击magiconion-sample-server.sln将其打开。
您应该具有如下所示的目录结构:
magiconion-sample-server
├── .git
├── .gitignore
├── README.md
├── Server
│   ├── Program.cs
│   └── Server.csproj
├── Shared
│   ├── Class1.cs
│   └── Shared.csproj
└── magiconion-sample-server.sln
另外,Shared工程在服务器端是在.NET8环境中执行的,在Unity客户端是在Unity2022.3.14f1编译环境(最高兼容C#9.0)中执行的,所以必须用C#9.0语法来编写。
准备 Shared 项目
Shared 项目定义一个接口。Shared项目中定义的接口将在 Server 项目中实现,并从 Unity 客户端使用。
首先修改Shared.csproj为以下内容
<Project Sdk="Microsoft.NET.Sdk">

  <PropertyGroup>
    <TargetFramework>netstandard2.1</TargetFramework>
    <LangVersion>9.0</LangVersion>
  </PropertyGroup>

  <ItemGroup>
    <PackageReference Include="MagicOnion.Abstractions" Version="6.0.0" />
    <PackageReference Include="MessagePack" Version="2.5.140" />
    <PackageReference Include="MessagePack.Annotations" Version="2.5.140" />
    <PackageReference Include="MessagePack.UnityShims" Version="2.5.140" />
  </ItemGroup>

</Project>
在Shared项目中定义接口
参考MagicOnion 的README来定义Interface。
在Shared目录下创建一个目录Interfaces,并在其下添加以下内容。
IMyFirstService.cs
using MagicOnion;
namespace Shared.Interfaces
{
    public interface IMyFirstService : IService<IMyFirstService>
    {
        UnaryResult<int> SumAsync(int x, int y);
    }
}
IGamingHub.cs
using System.Threading.Tasks;
using MagicOnion;
using MessagePack;
using UnityEngine;

namespace Shared.Interfaces
{
    public interface IGamingHubReceiver
    {
        void OnJoin(Player player);
        void OnLeave(Player player);
        void OnMove(Player player);
    }

    public interface IGamingHub : IStreamingHub<IGamingHub, IGamingHubReceiver>
    {
        ValueTask<Player[]> JoinAsync(string roomName, string userName, Vector3 position, Quaternion rotation);
        ValueTask LeaveAsync();
        ValueTask MoveAsync(Vector3 position, Quaternion rotation);
    }

    [MessagePackObject]
    public class Player
    {
        [Key(0)]
        public string Name { get; set; }
        [Key(1)]
        public Vector3 Position { get; set; }
        [Key(2)]
        public Quaternion Rotation { get; set; }
    }
}
Package化
接下来,在共享项目根目录中添加package.json,以便 Unity 将共享项目识别为包。
{
  "name": "com.magiconion-sample-server.shared",
  "version": "0.0.1",
  "displayName": "magiconion-sample-server shared"
}
删除不需要的Class1.cs后,Shared下的目录结构应该如下所示。
Shared
├── Interfaces
│   ├── IGamingHub.cs
│   └── IMyFirstService.cs
├── Shared.csproj
└── package.json
准备 Server 项目
接下来,我们将准备Server项目。
首先,添加 MagicOnion.Server 6.0.0 和Shared项目。
Server.csproj
<Project Sdk="Microsoft.NET.Sdk">

  <PropertyGroup>
    <OutputType>Exe</OutputType>
    <TargetFramework>net8.0</TargetFramework>
    <ImplicitUsings>enable</ImplicitUsings>
    <Nullable>enable</Nullable>
  </PropertyGroup>

  <ItemGroup>
    <PackageReference Include="MagicOnion.Server" Version="6.0.0"/>
    <ProjectReference Include="../Shared/Shared.csproj"/>
  </ItemGroup>

</Project>
在Server项目中实现接口
按照MagicOnion的README实施它。 目录结构如下。
Server
├── Program.cs
├── Server.csproj
├── Services
│   └── MyFirstService.cs
└─── StreamingHub
   └── GamingHub.cs
MyFistService.cs
using MagicOnion;
using MagicOnion.Server;
using Shared.Interfaces;

namespace Server.Services;

// copied from https://github.com/Cysharp/MagicOnion#service-implementation-server-side
// Implements RPC service in the server project.
// The implementation class must inherit `ServiceBase<IMyFirstService>` and `IMyFirstService`
public class MyFirstService : ServiceBase<IMyFirstService>, IMyFirstService
{
    // `UnaryResult<T>` allows the method to be treated as `async` method.
    public async UnaryResult<int> SumAsync(int x, int y)
    {
        Console.WriteLine($"Received:{x}, {y}");
        return x + y;
    }
}
GamingHub.cs
using MagicOnion.Server.Hubs;
using Shared.Interfaces;
using UnityEngine;

namespace Server.StreamingHub;

// copied from https://github.com/Cysharp/MagicOnion#streaminghub
// Server implementation
// implements : StreamingHubBase<THub, TReceiver>, THub
public class GamingHub : StreamingHubBase<IGamingHub, IGamingHubReceiver>, IGamingHub
{
    // this class is instantiated per connected so fields are cache area of connection.
    IGroup room;
    Player self;
    IInMemoryStorage<Player> storage;

    public async ValueTask<Player[]> JoinAsync(string roomName, string userName, Vector3 position, Quaternion rotation)
    {
        self = new Player() { Name = userName, Position = position, Rotation = rotation };

        // Group can bundle many connections and it has inmemory-storage so add any type per group.
        (room, storage) = await Group.AddAsync(roomName, self);

        // Typed Server->Client broadcast.
        Broadcast(room).OnJoin(self);

        return storage.AllValues.ToArray();
    }

    public async ValueTask LeaveAsync()
    {
        await room.RemoveAsync(this.Context);
        Broadcast(room).OnLeave(self);
    }

    public async ValueTask MoveAsync(Vector3 position, Quaternion rotation)
    {
        self.Position = position;
        self.Rotation = rotation;
        Console.WriteLine($"MoveAsync: {self.Name} pos:{position.x} {position.y} {position.z} rot:{rotation.x} {rotation.y} {rotation.z} {rotation.w}");
        Broadcast(room).OnMove(self);
    }

    // You can hook OnConnecting/OnDisconnected by override.
    protected override ValueTask OnDisconnected()
    {
        // on disconnecting, if automatically removed this connection from group.
        return ValueTask.CompletedTask;
    }
}
实现 Server 程序的入口点
我将把这些内容写成服务器程序的入口点。
Program.cs
using System.Net;
using System.Security.Cryptography.X509Certificates;
using Microsoft.AspNetCore.Builder;
using Microsoft.AspNetCore.Hosting;
using Microsoft.AspNetCore.Server.Kestrel.Core;
using Microsoft.Extensions.DependencyInjection;

namespace Server;

internal static class Program
{
    public static void Main(string[] args)
    {
        var builder = WebApplication.CreateBuilder(args);

        builder.WebHost.UseKestrel(options =>
        {
            options.ConfigureEndpointDefaults(endpointOptions =>
            {
                endpointOptions.Protocols = HttpProtocols.Http2;
            });

            // HTTP/1.1エンドポイントの設定
            options.Listen(IPAddress.Parse("0.0.0.0"), 5000, listenOptions =>
            {
                listenOptions.Protocols = HttpProtocols.Http1;
            });

            // HTTP/2 ,HTTPS エンドポイントの設定
            options.Listen(IPAddress.Parse("0.0.0.0"), 5001, listenOptions =>
            {
                // --load-cert=true が指定されていたら証明書を読み込む
                if (args.Any(arg => arg == "--load-cert=true"))
                {
                    Console.WriteLine("load certificate");
                    listenOptions.UseHttps(new X509Certificate2("certificate/certificate.pfx","test"));
                }
            });
        });

        builder.Services.AddGrpc();
        builder.Services.AddMagicOnion();

        var app = builder.Build();

        // テスト用のエンドポイント
        app.MapGet("/", () => "Hello World!");

        // MagicOnionのエンドポイント
        app.MapMagicOnionService();

        app.Run();
    }
}
我们考虑以下几点:
- 准备 HTTP/1.1 端点以进行问题隔离
- 设置端点IP0.0.0.0是为了在docker容器上启动Server时更容易从主机访问。
- 所以如果你想在宿主机上启动服务器127.0.0.1也是可以的。
- 有一个选项可以加载证书,但是它不起作用,因为我们此时还没有生成证书。
最后,将其推送到相应的 GitHub 存储库。
git push origin mainUnity客户端
提前准备
- 安装 C++ 编译器和 Windows SDK(如果需要)
- 例如,您可以启动
Visual Studio Installer并选择Change->Desktop Development with C++进行安装。 - IL2CPP 构建
- 例如,您可以启动
- 从 UnityHub 创建合适的 Unity 项目
- 我选择了Unity2022.3.14f1 & URP 3D模板。
- 添加.gitignore、.gitattribute
- 使用以下命令创建本地 git 存储库
git init
通过openupm添加所需的Unity包
在Packages 文件夹下的manifest.json文件添加以下内容scopedRegistries。
manfest.json
"scopedRegistries": [
    {
      "name": "package.openupm.com",
      "url": "https://package.openupm.com",
      "scopes": [
        "com.github-glitchenzo.nugetforunity",
        "com.cysharp.magiconion",
        "com.neuecc.messagepack",
        "com.cysharp.yetanotherhttphandler",
        "com.veriorpies.parrelsync"
      ]
    }
],dependencies添加以下内容:
...
 "dependencies": {
    "com.cysharp.magiconion": "6.1.4",
    "com.neuecc.messagepack": "2.5.140",
    "com.cysharp.yetanotherhttphandler": "1.4.1",
    "com.github-glitchenzo.nugetforunity": "4.1.1",
    "com.veriorpies.parrelsync": "1.5.2",
    "com.magiconion-sample-server.shared": "file:../../magiconion-sample-client/magiconion-sample-server/Shared/",
...
 }
添加后,它将如 manifest.json 所示
然后,将 server 项目作为子模块加入 client 中
git submodule add <url of MagicOnion-Sample-Server> magiconion-sample-server关于添加的包
- ParrelSync是一个允许您启动多个 Unity 编辑器并调试多人游戏的工具。
- 指定
"com.magiconion-sample-server.shared": "file:../../magiconion-sample-client/magiconion-sample-server/Shared/", 加载共享项目。"file:../../magiconion-sample-client/magiconion-sample-server/Shared/"我们之所以指定上面两级的父目录../../,是为了让ParrelSync能够正常工作。
- NuGetForUnity:Unity 的 NuGet 包管理器
- 使用此功能,您无需导入
.unitypacakge文件和加载 dll。 - 它还管理软件包版本,使更新更容易。
- 使用此功能,您无需导入
添加所需的 NuGet 包
首先,通过 NuGetForUnity添加YetAnotherHttpHandler依赖项。
通过在 NuGetForUnity GUI 上单击或编写以下内容来Assets/package.config添加上面列出的所需库。
另外,既然要看情况,我就补充一下MessagePack 2.5.140和Microsoft.NET.StringTools >=17.6.3。
NuGet Gallery | MessagePack 2.5.140
packages.config
<?xml version="1.0" encoding="utf-8"?>
<packages>
  <package id="Grpc.Core.Api" version="2.55.0" />
  <package id="Grpc.Net.Client" version="2.55.0" manuallyInstalled="true" />
  <package id="Grpc.Net.Common" version="2.55.0" />
  <package id="Microsoft.Extensions.Logging.Abstractions" version="3.0.3" />
  <package id="Microsoft.NET.StringTools" version="17.6.3" manuallyInstalled="true" />
  <package id="System.Diagnostics.DiagnosticSource" version="4.5.1" />
  <package id="System.IO.Pipelines" version="7.0.0" manuallyInstalled="true" />
  <package id="System.Runtime.CompilerServices.Unsafe" version="6.0.0" manuallyInstalled="true" />
</packages>
将 AssemblyDefinition 文件添加到Shared项目
在服务器端,使用 csproj 文件解决包依赖关系,但在 Unity 端,使用 asmdef 文件来解决包依赖关系。
从 Unity 编辑器的 Projet 窗口中打开该文件夹Packages/magiconion-sampler-server shared,然后在其下创建 Shared.asmdef 文件。
将 MessagePack.Annotations 和 MagicOnion.Abstractions 添加到 Assembly Deffinition References。
这允许您加载Shared项目中所需的任何 MagicOnion 或 MessagePack 依赖库。
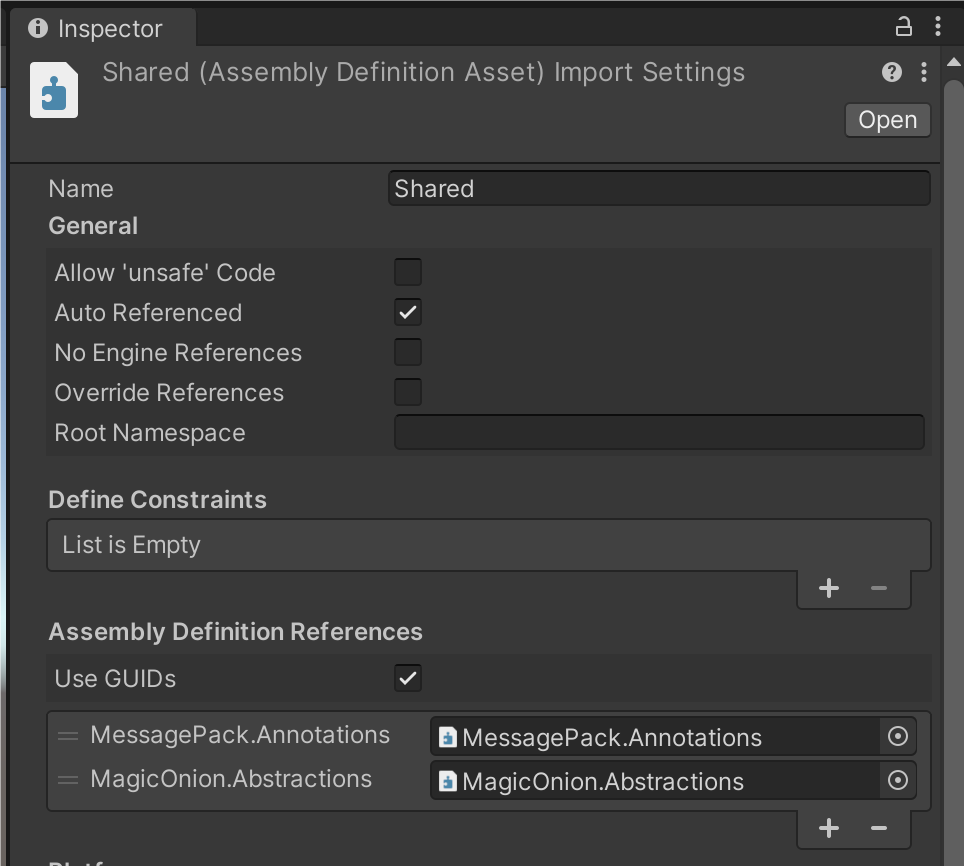
之后,让我们将更改推送到子模块 magiconion-sample-server 项目中的远程存储库。
# path-to/magiconion-sample-client
> cd magiconion-sample-server
> git status
Untracked files:
  (use "git add <file>..." to include in what will be committed)
        Shared/Shared.asmdef
> git add Shared/Shared.asmdef
> git commit -m "add asmdef"
> git push origin main
客户端实施
接下来参考MagicOnion的README实现Streming Hub。
在 Assets 下创建 Scripts 文件夹,然后创建 GamingHubClient.cs 脚本
GamingHubClient.cs
using System.Collections.Generic;
using System.Threading.Tasks;
using Grpc.Core;
using MagicOnion.Client;
using Shared.Interfaces;
using UnityEngine;

namespace SampleClient
{
   public class GamingHubClient : IGamingHubReceiver
   {
       private Dictionary<string, GameObject> _players = new();

       private IGamingHub _client;

       private readonly GameObject _ownPlayer;

       public GamingHubClient(GameObject player)
       {
           _ownPlayer = player;
       }

       public async ValueTask<GameObject> ConnectAsync(ChannelBase grpcChannel, string roomName, string playerName)
       {
           _client = await StreamingHubClient.ConnectAsync<IGamingHub, IGamingHubReceiver>(grpcChannel, this);

           var roomPlayers = await _client.JoinAsync(roomName, playerName, Vector3.zero, Quaternion.identity);
           foreach (var player in roomPlayers) (this as IGamingHubReceiver).OnJoin(player);

           return _players[playerName];
       }

       // methods send to server.

       public ValueTask LeaveAsync(string playerName)
       {
           foreach (var cube in _players)
               if (cube.Value.name != playerName)
                   Object.Destroy(cube.Value);

           return _client.LeaveAsync();
       }

       public ValueTask MoveAsync(Vector3 position, Quaternion rotation)
       {
           // たまにnullになることがあるので、nullチェックを入れる
           if (_client == null) return new ValueTask();
           return _client.MoveAsync(position, rotation);
       }

       // dispose client-connection before channel.ShutDownAsync is important!
       public Task DisposeAsync()
       {
           return _client.DisposeAsync();
       }

       // You can watch connection state, use this for retry etc.
       public Task WaitForDisconnect()
       {
           return _client.WaitForDisconnect();
       }

       // Receivers of message from server.

       void IGamingHubReceiver.OnJoin(Player player)
       {
           Debug.Log("Join Player:" + player.Name);

           // 自分の場合は自分のオブジェクトを生成しない
           if (_ownPlayer.name == player.Name)
           {
               _players[player.Name] = _ownPlayer;
           }
           else
           {
               var playerObject = GameObject.CreatePrimitive(PrimitiveType.Cube);
               var LitMat = Resources.Load<Material>("LitMat");
               playerObject.GetComponent<Renderer>().material = LitMat;
               playerObject.name = player.Name;
               playerObject.transform.SetPositionAndRotation(player.Position, player.Rotation);
               _players[player.Name] = playerObject;
           }
       }

       void IGamingHubReceiver.OnLeave(Player player)
       {
           Debug.Log("Leave Player:" + player.Name);

           if (_players.TryGetValue(player.Name, out var cube)) Object.Destroy(cube);
       }

       void IGamingHubReceiver.OnMove(Player player)
       {
           Debug.Log("Move Player:" + player.Name);

           if (_players.TryGetValue(player.Name, out var cube))
           {
               if (player.Name == _ownPlayer.name) return;
               cube.transform.SetPositionAndRotation(player.Position, player.Rotation);
           }
       }
   }
}
添加Cube控制器
允许您使用键盘输入操作 Cube。
创建 Controller.cs 脚本
using UnityEngine;

namespace SampleClient
{
    public class Controller : MonoBehaviour
    {
        public float moveSpeed = 5.0f;

        void Update()
        {
            if (Input.GetKey(KeyCode.W))
            {
                transform.Translate(Vector3.forward * (moveSpeed * Time.deltaTime));
            }
            if (Input.GetKey(KeyCode.S))
            {
                transform.Translate(Vector3.back * (moveSpeed * Time.deltaTime));
            }

            if (Input.GetKey(KeyCode.A))
            {
                transform.Translate(Vector3.left * (moveSpeed * Time.deltaTime));
            }
            if (Input.GetKey(KeyCode.D))
            {
                transform.Translate(Vector3.right * (moveSpeed * Time.deltaTime));
            }

            if (Input.GetKey(KeyCode.Q))
            {
                transform.Translate(Vector3.up * (moveSpeed * Time.deltaTime));
            }
            if (Input.GetKey(KeyCode.Z))
            {
                transform.Translate(Vector3.down * (moveSpeed * Time.deltaTime));
            }
        }
    }
}如下图所示,在场景中创建一个Cube(名称为user1),并将Controller.cs上面的内容附加到user1上。
//todo 补一张图
使用 UI ToolKit 添加 UI
基于UI ToolKit创建简单的UI并构建高效的 UI。如果还不了解 UI ToolKit 请先看官方文档熟悉一下。
例如,创建如下所示的 UI。
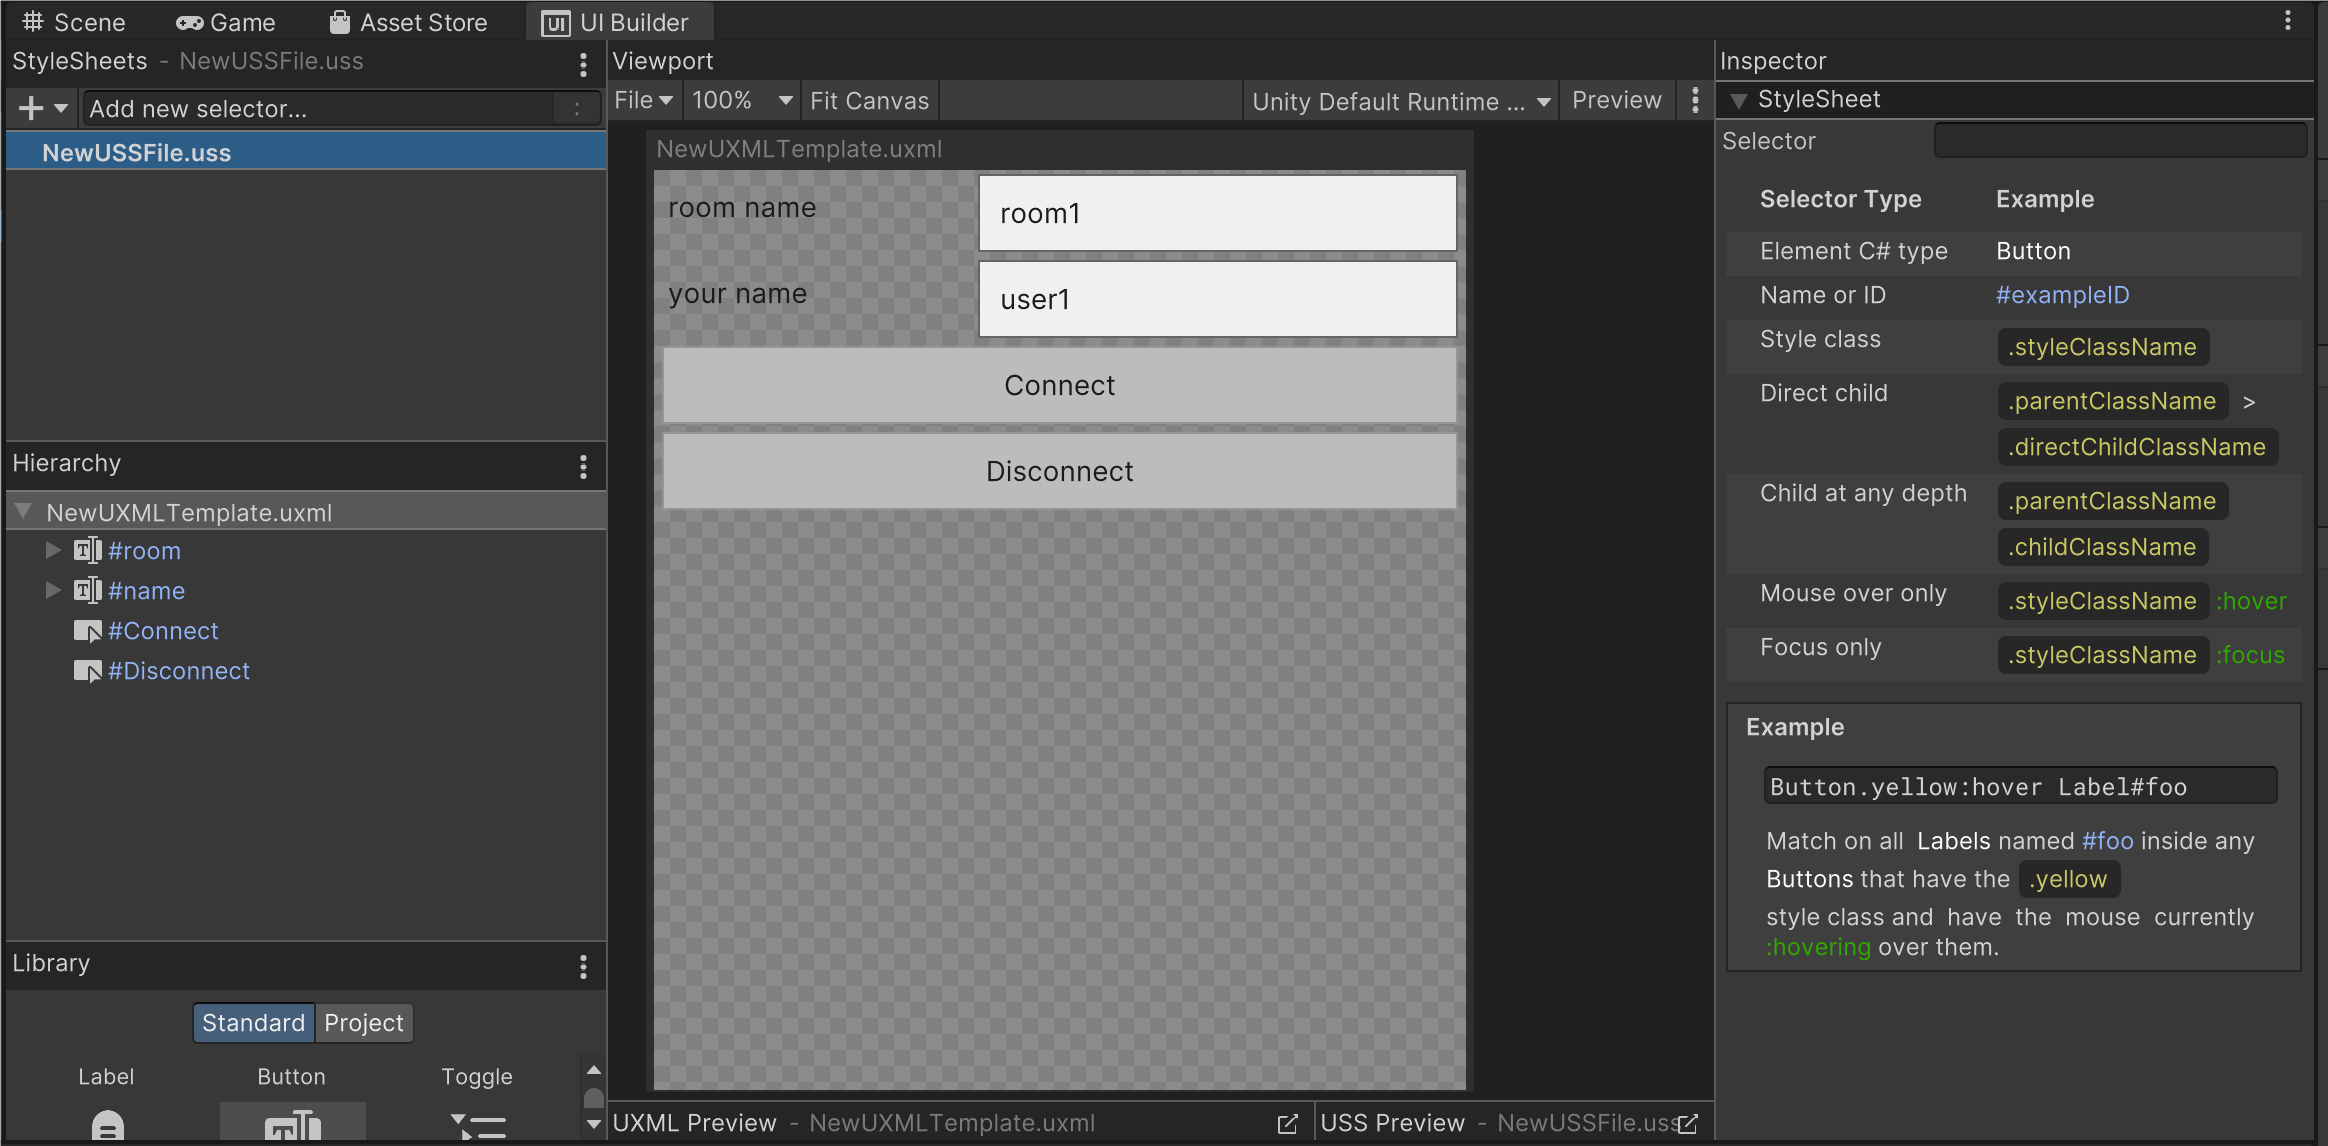
让我们链接上面 UI 的每个按钮和功能,并编写一些可以工作的代码。
(UI和功能没有分离,Dispose处理很可疑,但目前可以使用......)
SampleUIClient.cs
using System;
using Cysharp.Net.Http;
using Grpc.Core;
using Shared.Interfaces;
using Grpc.Net.Client;
using MagicOnion;
using MagicOnion.Client;
using UnityEngine;
using UnityEngine.UIElements;

namespace SampleClient
{
    public class SampleUIClient : MonoBehaviour
    {
        [SerializeField] private GameObject playerObject;
        private GamingHubClient _hubClient;
        private ChannelBase _channel;

        private TextField nameField;
        private TextField roomField;
        private bool _isConnected = false;

        private async void Start()
        {
            _channel = GrpcChannelx.ForAddress("http://127.0.0.1:5001/");

            var serviceClient = MagicOnionClient.Create<IMyFirstService>(_channel);
            var result = await serviceClient.SumAsync(100, 200);
            Debug.Log(result);

            // UIボタンと機能の連携
            var root = GetComponent<UIDocument>().rootVisualElement;
            var button = root.Q<Button>("Connect");
            button.clicked += async () =>
            {
                Debug.Log("room Button clicked!");
                if (_isConnected) return;
                _hubClient = new GamingHubClient(playerObject);
                _ = await _hubClient.ConnectAsync(_channel, roomField.value, nameField.value);
                _isConnected = true;
                nameField.isReadOnly = true;
                nameField.isReadOnly = true;
            };

            var button2 = root.Q<Button>("Disconnect");
            button2.clicked += async () =>
            {
                Debug.Log("name Button clicked!");
                _isConnected = false;
                nameField.isReadOnly = false;
                nameField.isReadOnly = false;
                await _hubClient.LeaveAsync(playerObject.name);
                await _hubClient.DisposeAsync();
            };

            nameField = root.Q<TextField>("name");
            playerObject.name = nameField.value;
            nameField.RegisterValueChangedCallback(evt =>
            {
                Debug.Log("Entered Name: " + evt.newValue);
                if (!_isConnected) playerObject.name = evt.newValue;
            });

            roomField = root.Q<TextField>("room");
            roomField.RegisterValueChangedCallback(evt =>
            {
                Debug.Log("Entered Name: " + evt.newValue);
                if (_isConnected) roomField.isReadOnly = true;
            });
        }

        private async void Update()
        {
            if (_hubClient == null) return;
            if (_isConnected)
            {
                var position = playerObject.transform.position;
                var rotation = playerObject.transform.rotation;
                await _hubClient.MoveAsync(position, rotation);
            }
        }

        private async void OnApplicationQuit()
        {
            if (_hubClient == null) return;
            await _hubClient.LeaveAsync(playerObject.name);
            await _hubClient.DisposeAsync();
        }
    }
}
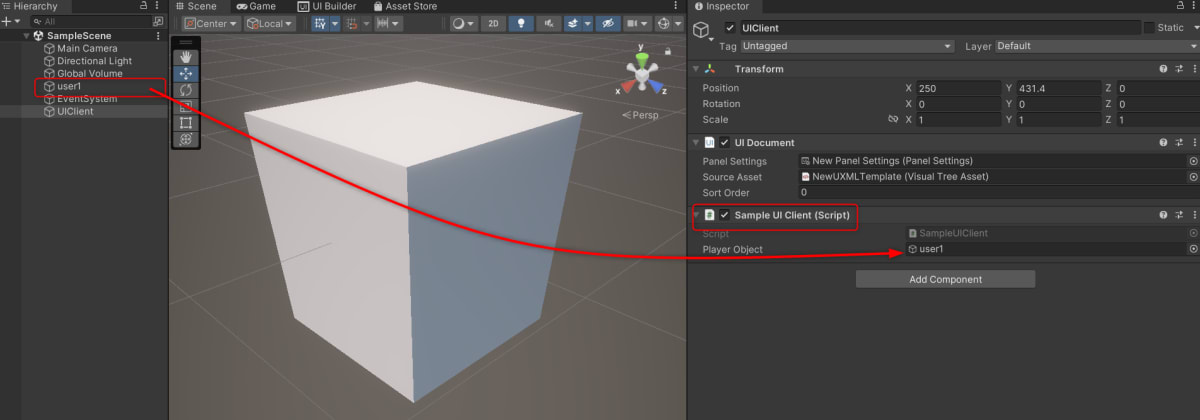
将上述脚本附加到场景中存在的 UI 文档所附加的游戏对象(下例中的 UIClient),并将您之前创建的 user1 分配给玩家对象。
生成 IL2CPP 代码
IL2CPP 是一种在构建时将 Unity 脚本中的 C# 代码生成的中间语言代码转换为 C++ 代码,然后编译为本机代码以生成可执行文件的机制。
另外,在通信部分(MagicOnion)和序列化部分(MessagePack)中使用了反射函数的一部分(在本例中,是一种使用对象类型信息动态生成高效代码的机制)。在大多数情况下,IL2CPP 禁止在以下位置动态生成代码。运行时,并限制依赖于动态代码生成的反射功能。
因此,IL2CPP要求提前生成依赖动态代码生成的反射函数所需的所有代码。
为了解决上述问题,MessagePack提供了代码生成工具,MagicOnion提供了SourceGnerator,所以我们将使用它们。
MessagePack for C# 代码生成
使用 mpc (MessagePack Codegen) 生成代码。这是作为编辑器扩展提供的,因此请使用它。请参阅MessagePack README继续操作。
首先需要生成 Shared.csproj 文件
在 External Tools 中,将 Local packages 勾上,点击 Regenerate project files ,生成 Shared.csproj
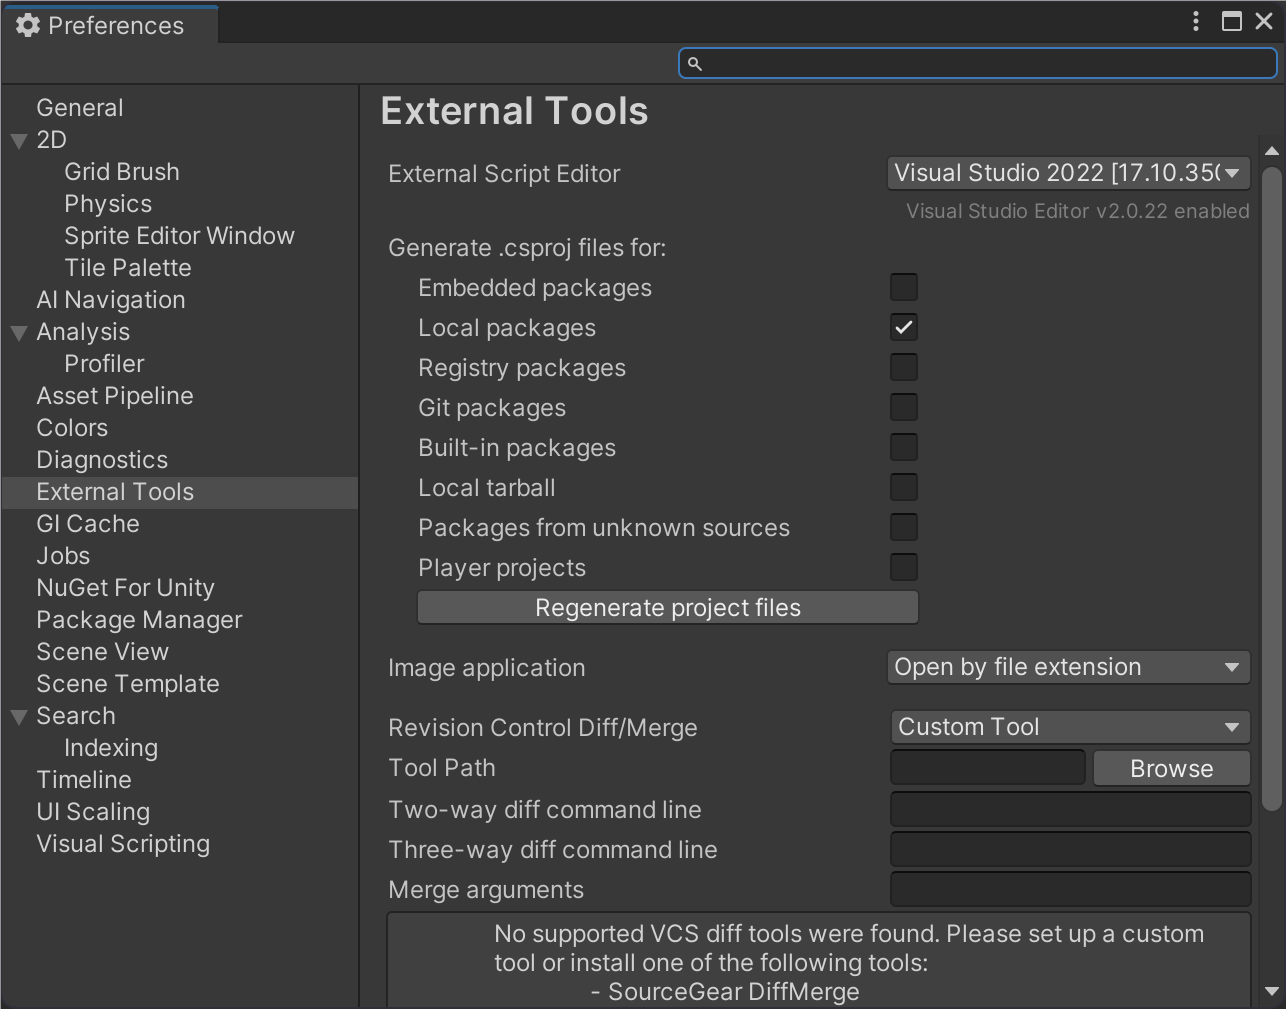
然后,按照以下设置,生成代码

上面的例子将生成:Assets/Scripts/Generated/Serializer.generated.cs
MagicOnion 和 Resolver 注册的代码生成
根据MagicOnion 的自述文件,它可以使用源生成器生成。
确保上面生成的代码 (MessagePackSampleResolver.Instance和MagicOnionClientInitializer.Resolver)在运行时注册在静态实例中。
在Assets/Scripts/目录下创建以下内容Initializer.cs。
Initializer.cs
using Grpc.Net.Client;
using MagicOnion.Client;
using MagicOnion.Unity;
using MessagePack;
using MessagePack.Resolvers;
using UnityEngine;

namespace SampleClient
{
    // Shared プロジェクト のアセンブリに含まれていれば、`IMyFirstService` か `IGamingHub` のどちらの指定でもOK
    [MagicOnionClientGeneration(typeof(Shared.Interfaces.IMyFirstService))]
    internal partial class MagicOnionClientInitializer
    {
    }

    public static class Initializer
    {
        [RuntimeInitializeOnLoadMethod(RuntimeInitializeLoadType.BeforeSceneLoad)]
        private static void RegisterResolvers()
        {
            // NOTE: Currently, CompositeResolver doesn't work on Unity IL2CPP build. Use StaticCompositeResolver instead of it.
            StaticCompositeResolver.Instance.Register(
                // This resolver is generated by MagicOnion's Source Generator.
                // See below for details. https://github.com/Cysharp/MagicOnion?tab=readme-ov-file#ahead-of-time-compilation-support-with-source-generator
                MagicOnionClientInitializer.Resolver,
                // This resolver is generated by MessagePack's code generator.
                MessagePackSampleResolver.Instance,
                BuiltinResolver.Instance,
                PrimitiveObjectResolver.Instance,
                MessagePack.Unity.UnityResolver.Instance,
                StandardResolver.Instance
            );

            MessagePackSerializer.DefaultOptions = MessagePackSerializer.DefaultOptions
                .WithResolver(StaticCompositeResolver.Instance);
        }

        [RuntimeInitializeOnLoadMethod(RuntimeInitializeLoadType.BeforeSceneLoad)]
        public static void OnRuntimeInitialize()
        {
            GrpcChannelProviderHost.Initialize(
                new GrpcNetClientGrpcChannelProvider(() => new GrpcChannelOptions()
                {
                    HttpHandler = new Cysharp.Net.Http.YetAnotherHttpHandler()
                    {
                        Http2Only = true
                    }
                }));
        }
    }
}
材质设置
在目录Assets/Rsources中生成一个材质LitMat,名称如下图所示。着色器是Universal Render Pipeline/Lit。通过将 LitMat 拖放到 user1 来更改user1 的材质。
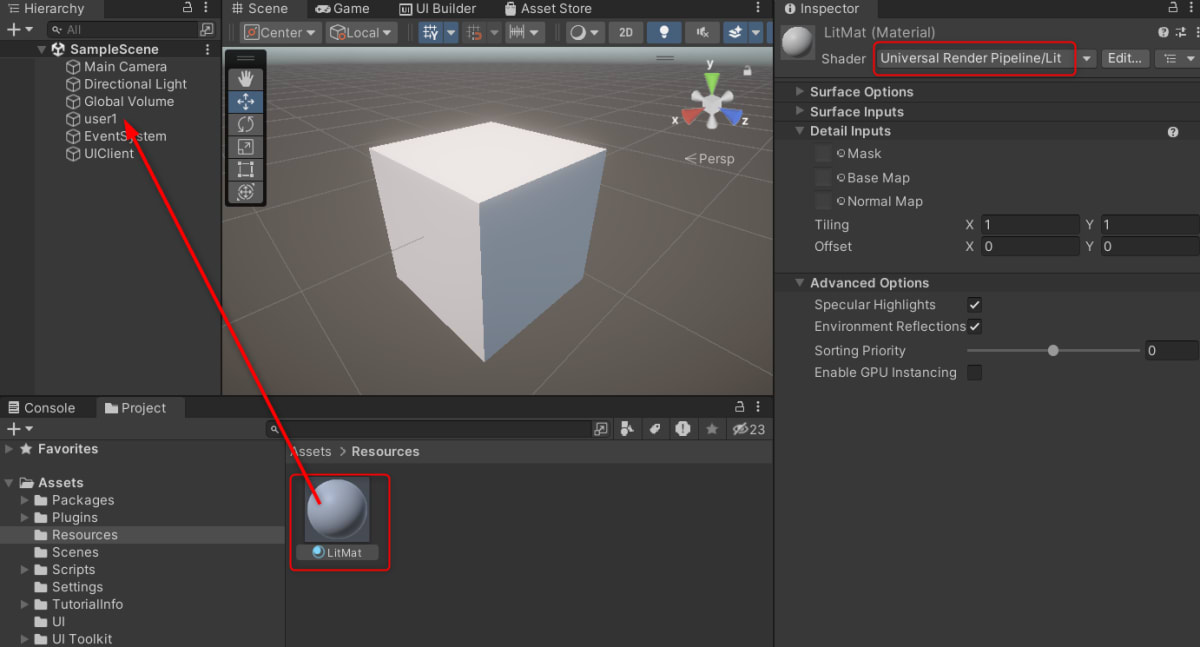
GameObject.CreatePrimitive(PrimitiveType.Cube)该材质附加到生成的立方体上,如下所示。由于某种原因,使用此方法时,在构建 URP 项目时未附加预期的材料。
Scripts/GamingHubClient.cs
var playerObject = GameObject.CreatePrimitive(PrimitiveType.Cube);
Material LitMat = Resources.Load<Material>("LitMat");
playerObject.GetComponent<Renderer>().material = LitMat;
配置 IL2CPP 构建
最后,配置 IL2CPP 构建的设置。
从 Unity 编辑器中点击 file -> BuildSetting -> PlayerSetting -> player
IL2CPP 后端脚本编写

在后台运行

将应用程序窗口大小调整为合适的大小
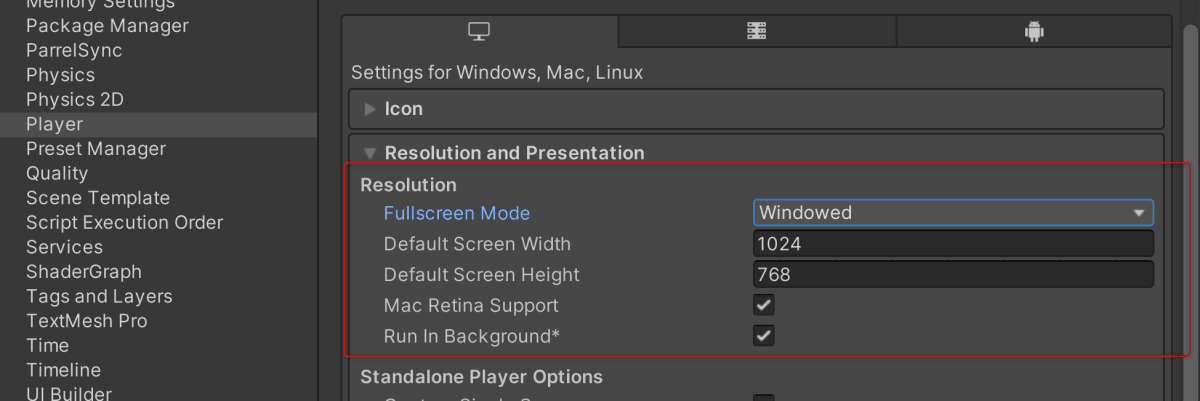
从 file -> BuildSetting -> build 来构建应用程序。
移动
通过直接从 IDE 运行 magiconion-sample-server 服务器项目或通过构建并运行可执行文件来启动服务器。
多次单击您之前创建的 Unity 客户端可执行文件以启动多个客户端。
我感觉是这样的。video
最后
搭建环境很困难,因为有很多令人惊讶的地方,但我很高兴客户端和服务器都可以用 C# 实现!
未来我希望能够写出以下内容的文章作为MagicOnion的素材。
- 使用 MagicOnion + MessgePack + YetAnotherHttpHandler 创建实时服务器(本文)
- 使用 Unity (YetAnotherHttpHandler) 和 MagicOnion 的自签名证书进行 HTTPS 和 HTTP/2 通信
- 在 GCP 上部署 MagicOnion Server 容器
- 使用 DFrame 对 MagicOnion 服务器进行负载测试
- 由于添加反向代理以进行 TLS 终止而导致服务器性能差异